FromEq. (19.17a)
T=p_{h} \times h \times s / \text { strip }=\left(\gamma K_{A}+q_{h}\right) h \times s (19.17a)
T=\left(\gamma z K_{A}+q_{h}\right) h \times s=\left(p_{o}+q_{h}\right) A_{c}
where \gamma=17.5 kN / m ^{3}, K_{A}=0.26, A_{c}=h \times s=(0.5 \times 0.5) m ^{2}
FromEq. (19.13a)
q_{h}=\frac{2 q_{s}}{\pi}(\beta-\sin \beta \cos 2 \alpha) (19.13a)
q_{h}=\frac{2 q_{s}}{\pi}[\beta-\sin \beta \cos 2 \alpha]
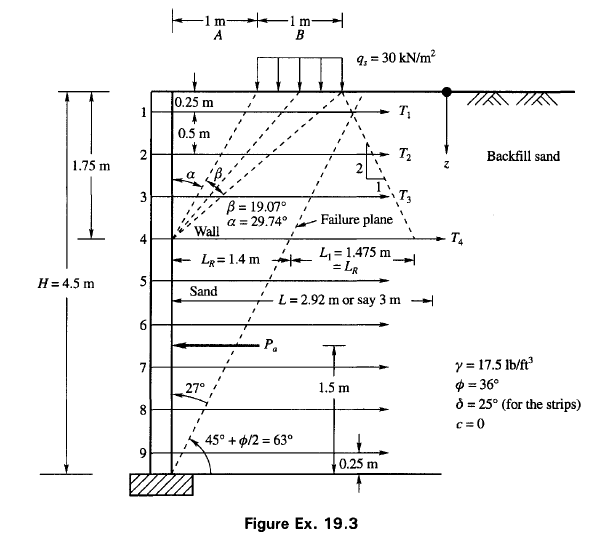
Refer to Fig. Ex. 19.3 for the definition of \alpha \text { and } \beta.
q_{s}=30 kN / m ^{2}
The procedure for calculating length L of the strip for one depth z = 1.75 m (strip number 4) is explained below. The same method is valid for the other strips.
Strip No. 4. Depth z = 1.75 m
p_{a}=\gamma z K_{A}=17.5 \times 1.75 \times 0.26=7.96 kN / m ^{2}
From Fig. Ex. 19.3, \begin{aligned}&\beta=19.07^{\circ}=0.3327 \text { radians } \\&\alpha=29.74^{\circ} \\&q_{s}=30 kN / m ^{2}\end{aligned}
q_{h}=\frac{2 \times 30}{3.14}\left[0.3327-\sin 19.07^{\circ} \cos 59.5^{\circ}\right]=3.19 kN / m ^{2}
Figure Ex. 19.3 shows the surcharge distribution at a 2 (vertical) to 1 (horizontal) slope. Per the figure at depth z = 1.75 m, L_{1}=1.475 m from the failure line and L_{R}=(H-z) \tan \left(45^{\circ}-\phi / 2\right) =2.75 \tan \left(45^{\circ}-36^{\circ} / 2\right)=1.4 1.4m from the wall to the failure line. It is now necessary to determine L_{2} (Refer to Fig. 19.15a).
Now T=(7.96+3.19) \times 0.5 \times 0.5=2.79 kN / strip.
The equation for the frictional resistance per strip is
F_{R}=2 b(\gamma z+\Delta q) L_{1} \tan \delta+\left(\gamma z L_{2} \tan \delta\right) 2 b
From the 2:1 distribution \Delta q \text { at } z=1.75 m is
\Delta q=\frac{Q}{B+z}=\frac{30 \times 1}{1+1.75}=10.9 kN / m ^{2}
p_{o}=17.5 \times 1.75=30.63 kN / m ^{2}
Hence \overline{p_{o}}=10.9+30.63=41.53 kN / m ^{2}
Now equating frictional resistance F_{R} to tension in the strip with F_{s}=1.5, we have F_{R}=1.5 Given b = 100 mm. Now from Eq. (19.20)
F_{R}=2 b\left[\bar{p}_{o} L_{1}+p_{o} L_{2}\right] \tan \delta \leq T F_{s} (19.20)
F_{R}=2 b \tan \delta\left(\bar{p}_{o} L_{1}+p_{o} L_{2}\right)=1.5 T
Substituting and taking \delta=25^{\circ}, we have
2 \times 0.1 \times 0.47\left[41.53 \times 1.475+30.63 L_{2}\right]=1.5 \times 2.79
Simplifying
Hence \begin{aligned}&L_{2}=-0.546 m \approx 0 \\&L_{e}=L_{1}+0=1.475 m \\&L=L_{R}+L_{e}=1.4+1.475=2.875 m\end{aligned}
L can be calculated in the same way at other depths.
Maximum tension T
The maximum tension is in strip number 9 at depth z = 4.25m
Allowable T_{a}=f_{a} b t=143.7 \times 10^{3} \times 0.1 \times 0.005=71.85 kN
T=\left(\gamma z K_{A}+q_{h}\right) s h
where \gamma z K_{A}=17.50 \times 4.25 \times 0.26=19.34 kN / m ^{2}
q_{h}=0.89 kN / m ^{2} \text { from equation for } q_{h} \text { at depth } z=4.25 m.
Hence T=(19.34+0.89) \times 1 / 2 \times 1 / 2=5.05 kN / strip <71.85 kN – OK